• Skip to primary navigation
  • Skip to main content

Halftone.us HomepageHalftone.us

Halftone Illustrator, Photoshop & InDesign Patterns & Fills

  • Halftone Tint Packs
    • Learn More
    • Illustrator Tint Pack
    • Photoshop Tint Pack
    • InDesign Tint Pack
  • Examples
  • How-To
  • Support
    • FAQ
    • Contact
  • Blog
  • 0 items

Tutorials

Photoshop Tint Pack Example File

March 7, 2018 by admin

In Photoshop, there are often many ways to do the same thing, and most designers develop their own unique workflows with which they’re comfortable (efficient or not). Thus, we don’t offer tutorials for our Photoshop Tint Pack … too many ways to fry that fish.

If you’d like to get an idea of what you’re in for, here’s a downloadable example that will give you a feel for one possible Photoshop Tint Pack workflow.

photoshop-cube.tif, 1.7 MB Photoshop TIFF file

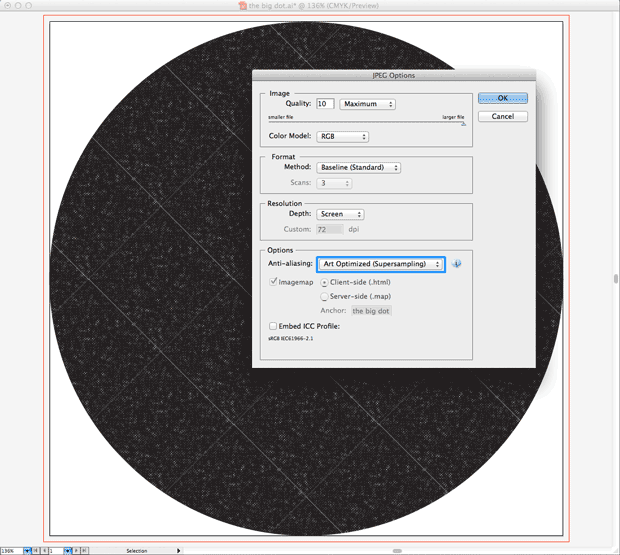
It’s a layered TIFF file, So save it to your computer, open it in Photoshop, and expand the layers to see how the tints are being used. Rather than using the Tint Pack on its own, we’ve inverted it (option-i) and used it to mask a solid color layer.


Filed Under: Photoshop Tint Pack, Tutorials

Open the Illustrator Tint Pack

December 24, 2014 by admin

Filed Under: Illustrator Tint Pack, Tutorials, Video

Apply & Scale an Illustrator Tint Pack Fill

January 13, 2015 by admin

Filed Under: Illustrator Tint Pack, Tutorials, Video

Rotate an Illustrator Tint Pack Fill

January 13, 2015 by admin

Filed Under: Illustrator Tint Pack, Tutorials, Video

Recolor an Illustrator Tint Pack Fill

January 14, 2015 by admin

Filed Under: Illustrator Tint Pack, Tutorials, Video

Open a Swatch Library in Adobe Illustrator

December 16, 2013 by admin

To use our swatches in Adobe Illustrator (like our Tint Pack):

Choose Window > Swatch Libraries > Other Library > [select library].

Or, in the Swatches panel menu, choose Open Swatch Library > Other Library > [select library].

The imported swatches appear in a swatch library panel (not the Swatches panel).

Swatches panel menu > Open Swatch Library > Other Library > [select library]

Filed Under: Tutorials

Improve Previews in Adobe Illustrator’s Swatch Panels

December 16, 2013 by admin

Pattern swatches with a lot of detail may appear very dark in the default “Small Thumbnail View” setting.

Small Thumbnail View

Switching your swatch view to “Large List View” in the swatch library panel menu yields a much more useful preview.

Large List View
Large List View

Filed Under: Tips, Tutorials

Rotate & Scale Pattern Fills in Adobe Illustrator

December 18, 2013 by admin

In this example, we’ll rotate and scale our Tint Pack pattern after it’s been applied to an object.

Screen Shot 2013-12-18 at 12.05.18 AM
Before
rotate-box
Select the object with the fill you’d like to modify, then double-click the Rotate tool.
rotate-percentage
Enter an angle and uncheck the Objects option box.
scale-box
Double-click the Scale tool.
Enter a percentage and uncheck the Objects option box.

Filed Under: Tutorials

Change The Color of a Pattern Fill in Adobe Illustrator

December 16, 2013 by admin

In this example, we’ll change the color of our Tint Pack pattern after it’s been applied to an object.

Before
Before
Edit > Edit Colors > Recolor Artwork
Click Color Reduction Options. Uncheck Black.
Click Color Reduction Options. Uncheck Preserve Black.
Enter the formula of the color you’d like.
Enter the formula of the color you’d like using the sliders.
After
After

Filed Under: Tutorials

What to Do About Tiled Pattern Artifacts in Adobe Illustrator

December 19, 2013 by admin

Sometimes when zooming-into or out-of your artwork in Illustrator, thin lines appear in parts of your design which contain tiled pattern swatches.

They can be straight-across or angled, depending upon whether you’ve rotated the fill. Have a look at the first image below to see what these lines look like (in this case the fill had been rotated 45-degrees).

Most of the time, these lines are artifacts resulting from how illustrator previews your file … meaning they’re not in your prints or exported artwork.

Occasionally these lines appear in exported rasterized artwork. Here’s what to do when that happens.

illustrator_tile_artifacts_export_settings
When exporting (File > Export), set your Anti-Aliasing Option to “Art Optimized” (not “Type Optimized”).
illustrator_tile_artifacts_example
Voila … Perfect rasterized file with no tiling artifacts.

Filed Under: Tips, Tutorials

© 2023 Halftone.us